

If you’ve recently undergone a renovation in your home or office, you’ll know that the process can be both exciting and exhausting. Once the dust has settled, however, it’s important to tackle the post renovation cleaning process to ensure that your space is safe, hygienic, and ready to use.
Post renovation cleaning is a crucial step in the renovation process, and it involves more than just a quick sweep and dusting. In fact, it often requires a thorough cleaning of all surfaces, floors, and fixtures, as well as the removal of any debris, dust, or residue left behind from the construction process.
In this blog post, we’ll provide you with a comprehensive guide to post renovation cleaning, including tips and tricks for removing common stains, as well as general advice for tackling the cleaning process efficiently and effectively.
Common Stains and How to Remove Them Yourself
During the renovation process, it’s common to end up with stubborn stains on various surfaces, ranging from floors and walls to countertops and fixtures. Here are some of the most common types of stains that you might encounter during the post renovation cleaning process, as well as tips on how to remove them.
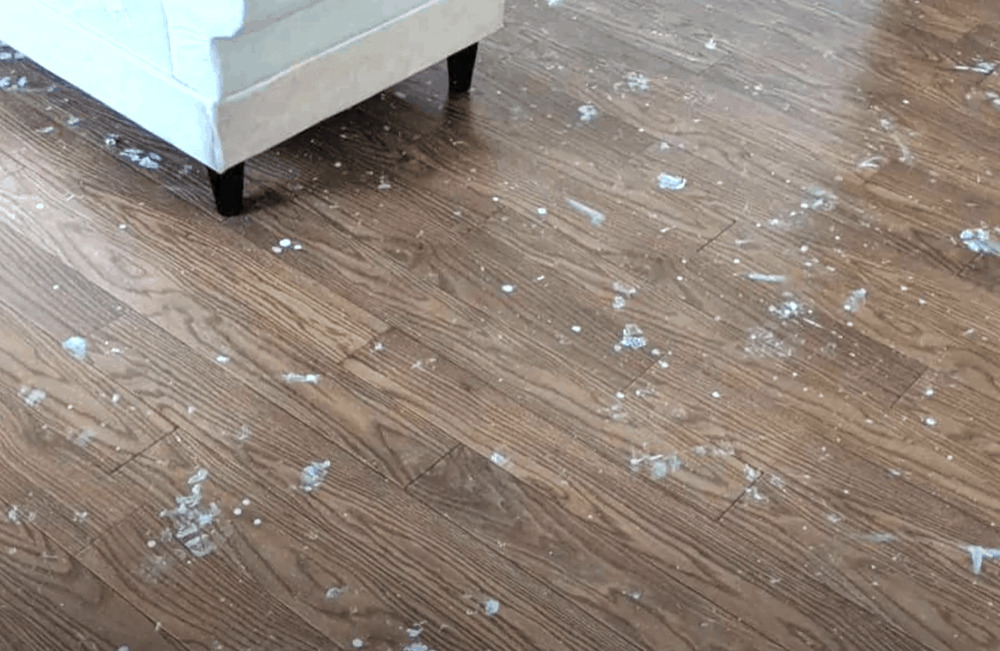
Photo by whatisvinyl
How to Remove Paint Stains Yourself
Paint stains are one of the most common types of stains that you’re likely to encounter after a renovation. If left untreated, they can be difficult to remove, and may even become permanent.
To remove paint stains, you’ll need a few basic supplies, including a scraper or putty knife, a soft-bristled brush, warm water, and a cleaning solution. Here are the steps to follow:
- Start by using the scraper or putty knife to gently scrape away any excess paint from the surface.
- Next, dip the brush into warm water and use it to scrub the remaining paint gently.
- If the stain is particularly stubborn, you may need to use a cleaning solution. For water-based paint, use a mixture of warm water and dish soap, while for oil-based paint, use a mixture of warm water and mineral spirits.
- Apply the cleaning solution to the stain and use the brush to scrub it gently.
- Rinse the area with warm water and dry with a clean cloth.
Remember to wear gloves and eye protection when using any cleaning solutions, and always follow the manufacturer’s instructions.
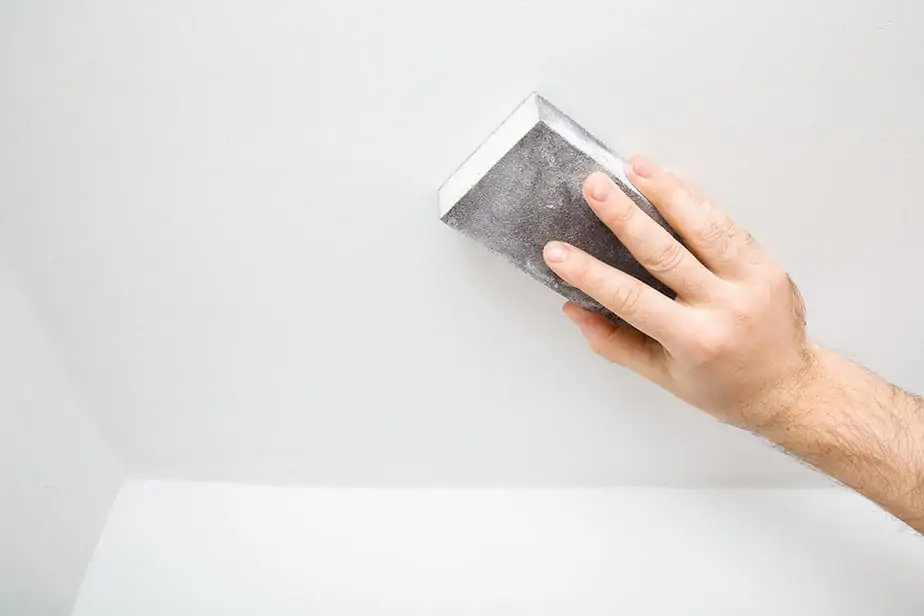
Photo by Pepper’sHomeGarden
How to Remove Plaster and Drywall Dust Yourself
Plaster and drywall dust can leave behind a fine layer of dust that can be difficult to remove with a regular vacuum or dusting. Here’s how to tackle this common post renovation cleaning issue:
- Start by using a dry microfiber cloth, sponge or a vacuum cleaner with a HEPA filter to remove any loose dust from the surface.
- Next, mix a cleaning solution of warm water and dish soap.
- Dip a clean microfiber cloth into the solution and wring out any excess water.
- Use the cloth to wipe down the surface, working in small sections.
- Rinse the cloth frequently and change the cleaning solution as needed.
- Once you’ve finished wiping down the surface, go over it again with a dry microfiber cloth to remove any remaining moisture.

Photo by HomeandGarden
How to Remove Grease and Oil Stains Yourself
If you’ve been cooking in your newly renovated kitchen, you might find yourself dealing with stubborn grease and oil stains on your countertops or backsplash. Here’s how to remove them:
- Start by blotting up any excess grease or oil with a paper towel or cloth.
- Next, mix a cleaning solution of warm water and dish soap (preferably Mr.Musle or CIF).
- Dip a clean cloth into the solution and use it to scrub the stain gently.
- If the stain is particularly stubborn, you may need to use a specialized grease-cutting cleaner or a mixture of warm water and vinegar.
- Rinse the area with warm water and dry with a clean cloth.
Always wear gloves when handling any cleaning solutions, and make sure to follow the manufacturer’s instructions. Additionally, be careful not to use abrasive cleaners or tools on delicate surfaces, as this can cause damage.
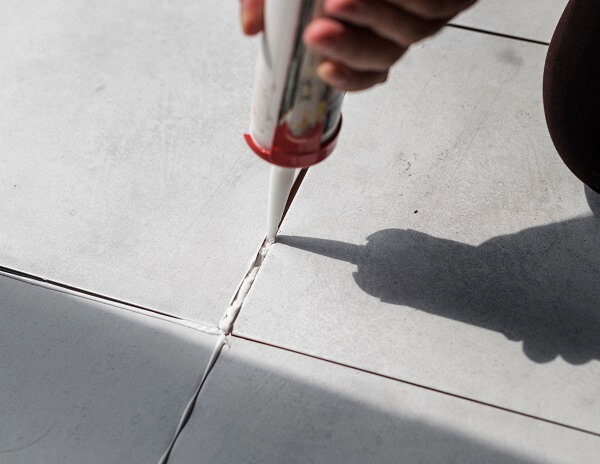
Photo by LuceMaintenanceGroup
How to Remove Tile Grout Stains Yourself
Tile grout can be especially prone to staining during a renovation, as it’s often exposed to construction materials and debris. Here’s how to remove grout stains:
- Mix a cleaning solution of equal parts warm water and vinegar.
- Dip a toothbrush or grout brush into the solution and use it to scrub the stained grout.
- For particularly stubborn stains, you may need to use a commercial grout cleaner.
- Rinse the area with warm water and dry with a clean cloth.
It’s important to avoid using harsh chemicals or abrasive tools on grout, as this can cause damage or discoloration.

Photo by SingaporeCarpetCleaning
How to Remove Carpet Stains Yourself
Carpeting is another surface that’s likely to get stained during a renovation, especially if you’re tracking in dirt and debris from outside. Here’s how to remove carpet stains:
- Start by blotting up any excess liquid or debris with a clean cloth or paper towel.
- Mix a cleaning solution of warm water and dish soap.
- Dip a clean cloth into the solution and use it to blot the stain gently.
- Rinse the cloth frequently and change the cleaning solution as needed.
- Once you’ve removed as much of the stain as possible, use a carpet cleaner or spot treatment for any remaining discoloration.
Always test any cleaning solution or treatment on a small, inconspicuous area of the carpet before applying it to the stain.
By following these steps and using the right tools and cleaning solutions, you can effectively remove common post renovation stains and restore your surfaces to their former glory. Remember to always wear gloves and protective eyewear when handling any cleaning solutions, and be careful not to use abrasive tools or harsh chemicals on delicate surfaces.

Tips and Tricks for post renovation Cleaning
Cleaning up after a renovation can be a daunting task, but with the right tools and strategies, it doesn’t have to be overwhelming. Here are some general tips to help you tackle post renovation cleaning like a pro:
Create a Cleaning Plan
Before you begin cleaning, it’s helpful to create a plan of action. This might involve dividing the space into sections and tackling each section one at a time, starting with the areas that need the most attention. You may also want to prioritize tasks based on their level of difficulty or the amount of time they will take.
Use the Right Tools and Products
Having the right tools and products on hand can make a big difference in the efficiency and effectiveness of your post renovation cleaning. Some essential tools and products to consider include:
- Vacuum cleaner with a HEPA filter
- Microfiber cloths
- Soft-bristled brush
- Scraper or putty knife
- Cleaning solutions, such as warm water and dish soap, vinegar, or specialized cleaners
Enlist Help if Necessary
If you’re feeling overwhelmed by the cleaning process, don’t hesitate to enlist the help of friends or family members. Having an extra set of hands can make the cleaning process go much more quickly, and can also make the experience more enjoyable.
In addition to these general tips, there are also specific tricks you can use to tackle particularly stubborn stains or areas of the home:
Use a Steam Cleaner for Carpets
If your carpets are especially stained or dirty, a steam cleaner can be a highly effective tool for removing dirt and grime. The high temperature and pressure of the steam can penetrate deep into the carpet fibers, helping to loosen and remove dirt and stains.
Use a Vinegar Solution for Grout
If your tile grout is particularly stained or discolored, a solution of warm water and vinegar can be an effective natural cleaner. Simply mix equal parts warm water and vinegar, apply the solution to the grout, and scrub with a toothbrush or grout brush.
Addressing Frequently Asked Questions and Concerns
Some frequently asked questions or concerns related to post renovation cleaning may include:
- How long should I wait to clean after a renovation?
- How do I avoid damaging delicate surfaces during the cleaning process?
- Can I use bleach to clean after a renovation?
In general, it’s best to wait at least 24 hours after a renovation before beginning the cleaning process. Additionally, it’s important to avoid using abrasive tools or harsh chemicals on delicate surfaces, and to always test cleaning solutions on a small, inconspicuous area before using them more broadly.
Finally, while bleach can be effective for removing stains and disinfecting surfaces, it’s important to use it carefully and to follow the manufacturer’s instructions to avoid damage or injury.
By following these tips and tricks, you can make the post renovation cleaning process as efficient and effective as possible, while also avoiding damage to your surfaces and maintaining a safe and healthy environment in your home or office.
How Would A Professional Post Renovation Cleaning Company Tackle These Common Stains?
Post renovation cleaning is an important step in any renovation project, as it ensures that your space is safe, hygienic, and ready to use. However, it can be a time-consuming and labour-intensive process, especially if you’re dealing with stubborn stains or difficult-to-clean surfaces. That’s where a professional post renovation cleaning company can help.
A professional cleaning company can provide a range of services designed to tackle even the toughest post renovation cleaning challenges. In this section, we’ll explore some of the ways in which a professional cleaning company can help you achieve a clean, safe, and comfortable living or working environment after your renovation project.
In this section, we discuss how post renovation cleaning experts tackle stains with various cleaning methods, chemicals and equipment
Dust and Dirt
Post renovation cleaning companies have specialized tools and methods to effectively tackle dust and dirt left behind after a renovation. Here are some of the ways in which professional cleaning companies may tackle dust and dirt:
HEPA-filtered Vacuuming
Professional cleaning companies often use vacuums with HEPA (high-efficiency particulate air) filters to effectively remove dust and dirt from surfaces and floors. HEPA filters are designed to capture even the smallest particles, such as dust mites and pet dander, ensuring that the air in your home or office is clean and free of harmful allergens.
Microfiber Cloth Dusting
Microfiber cloths are highly effective at trapping and removing dust and dirt from surfaces. Professional cleaning companies may use these cloths to dust surfaces such as countertops, shelves, and furniture, as well as hard-to-reach areas like baseboards and crown moulding.
Wet Cleaning
For surfaces with stubborn dust and dirt, professional cleaning companies may use wet cleaning methods. This involves using a cleaning solution and a damp cloth or mop to wipe down surfaces and floors. Wet cleaning can be especially effective for floors, as it can pick up more dirt and dust than dry cleaning methods.
Air Purification
Professional cleaning companies may also use air purifiers to effectively remove dust and other airborne particles from the air. These machines work by filtering the air and removing pollutants, such as dust, pet dander, and mould spores, ensuring that the air in your home or office is clean and healthy.
Post-Construction Cleaning
For larger renovation projects, professional cleaning companies may also offer post-construction cleaning services. This involves a thorough cleaning of the entire space, including walls, floors, and fixtures, to remove any dust and debris left behind after the renovation projects.
Paint Stains
Identifying the Type of Paint
Before beginning the removal process, a professional cleaning company will identify the type of paint that has stained the surface. This is important, as different types of paint require different removal methods and products.
Preparing the Surface
To prepare the surface for paint removal, a professional cleaning company may scrape any loose paint or residue using a scraper or putty knife. They will then sand the area with fine-grit sandpaper to create a smooth surface for paint removal.
Applying a Paint Remover
Once the surface is prepared, a professional cleaning company will apply a paint remover to the affected area. This may be a specialized product designed for the type of paint on the surface, or a more general-purpose paint remover.
Allowing the Paint Remover to Work
After applying the paint remover, a professional cleaning company will allow it to work for a specified period of time, typically between 10 and 30 minutes. During this time, the paint remover will soften and dissolve the paint, making it easier to remove.
Scrubbing the Surface
Once the paint remover has had time to work, a professional cleaning company will scrub the surface with a soft-bristled brush or scouring pad. They will pay special attention to areas with particularly stubborn paint, such as corners or edges.
Rinsing the Surface
After scrubbing, a professional cleaning company will rinse the surface thoroughly with warm water. They may use a high-pressure washer to ensure that all traces of paint remover and paint are removed.
By following these steps, a professional post renovation cleaning company can effectively remove paint stains from surfaces, restoring them to their original appearance. It’s important to note that attempting to remove paint stains on your own can be dangerous and ineffective without the proper tools and knowledge.
Adhesive Residue
Identifying the Type of Adhesive
Before beginning the removal process, a professional cleaning company will identify the type of adhesive that has left residue on the surface. This is important, as different types of adhesives require different removal methods and products.
Preparing the Surface
To prepare the surface for adhesive removal, a professional cleaning company may use a scraper or putty knife to remove any loose adhesive or residue. They will then clean the area with a mild detergent and warm water to remove any dirt or debris.
Applying an Adhesive Remover
Once the surface is prepared, a professional cleaning company will apply an adhesive remover to the affected area. This may be a specialized product designed for the type of adhesive on the surface, or a more general-purpose adhesive remover.
Grime and Grease
Assess the situation: The cleaning team first assesses the type and extent of grime and grease present in the renovated space. This helps them choose the most effective cleaning methods and products.
Use appropriate cleaning products: Professionals use industrial-strength cleaning products designed to break down and remove grime and grease. These may include degreasers, all-purpose cleaners, and solvents. They select the most suitable product depending on the surface to be cleaned.
Apply the cleaning solution: The cleaning solution is applied to the affected area, and it is allowed to sit for a short period to loosen and break down the grime and grease.
Scrubbing and agitation: The cleaning team uses specialized equipment, such as scrubbers, brushes, and abrasive pads, to agitate the surface and remove the grime and grease. Care is taken to avoid damaging the surface during this process.
Rinse and repeat: After scrubbing, the surface is rinsed with clean water, and the process may be repeated if necessary until the grime and grease are completely removed.
Steam cleaning: For particularly stubborn grime and grease, professional cleaning companies may use steam cleaners. These machines produce high-temperature steam that can dissolve and lift away grease, grime, and dirt from various surfaces.
Proper ventilation: Ensuring proper ventilation during and after the cleaning process helps remove lingering odors and fumes from cleaning agents.
Final inspection: Once the cleaning process is complete, the cleaning team inspects the area to ensure that all grime and grease have been removed and that the renovated space is ready for use.
Rust Stains
Assess the situation: The cleaning team first evaluates the extent and location of the rust stains. This helps them choose the most suitable cleaning methods and products for the specific surface.
- Select appropriate rust removers: Professionals use rust removers that are specifically designed to dissolve and eliminate rust stains without causing damage to the surface. Common rust removers include oxalic acid, phosphoric acid, and citric acid-based products.
- Test the product: Before applying the rust remover to the entire stained area, the cleaning team tests it on a small, inconspicuous spot to ensure it does not damage the surface or discolour it.
- Apply the rust remover: The cleaning team applies the rust remover to the stained area according to the product’s instructions. This may involve using a cloth, sponge, or brush to apply the solution.
- Allow the product to work: The rust remover is left on the stain for the recommended amount of time, which may vary depending on the product and the severity of the rust stain. This allows the product to penetrate and break down the rust.
- Scrubbing and agitation: If necessary, the cleaning team may use a non-abrasive brush or sponge to gently scrub the rust-stained area to help loosen and lift away the rust.
- Rinse and dry: After the rust remover has had time to work, the area is rinsed with clean water to remove any residue. The surface is then dried with a clean cloth or allowed to air dry.
- Repeat if necessary: If the rust stain is not completely removed after the first application, the cleaning team may repeat the process until the stain is gone.
- Protective measures: After removing the rust stains, the cleaning team may apply a protective coating or sealant to the surface to help prevent future rust stains, especially in areas prone to moisture or high humidity.
In conclusion, post-renovation cleaning is a crucial step to ensure that your home or office is safe, healthy, and ready to use after a renovation project. Whether you choose to tackle the cleaning process yourself or hire a professional cleaning company, there are several key points to keep in mind:
- Identify the types of stains or residue that need to be removed, and use the appropriate tools and methods for each.
- Use safety precautions such as wearing gloves and eye protection when handling cleaning products.
- Make a plan for tackling the cleaning process, and enlist help if necessary.
- Use high-quality cleaning products and tools for best results.
- Consider hiring a professional post renovation cleaning company for larger or more complex renovation projects.
By following these key points and using the tips and tricks outlined in this article, you can effectively tackle post-renovation cleaning and ensure that your space is clean, safe, and ready to use. Remember, a clean and healthy environment is essential for your well-being, so take the time to properly clean up after your renovation project to enjoy the full benefits of your newly renovated space.

2 thoughts on “Post Renovation cleaning – Common stains and how to tackle them”
Pingback: Post-Renovation Cleaning Checklist | L'Essenziale
Pingback: Post-Renovation Cleaning Checklist | L'Essenziale - Interior Good Day